OpusPAY
User guide
×
Menu
Index

Add Account - Enter Account Details

This screen allows the user to add sub-accounts to their merchant portal.
 
Add Account - Enter Account Details
1

Back

 
Type
Notes
Rules
Compulsory
Format
Edit
Size
Default
Error Message
Button
-
1. When clicked this should navigate the user to Accounts screen without saving any changes. Refer to the specification for that page here.
-
-
Y
-
-
-
2

Enter Account Details

 
Type
Notes
Rules
Compulsory
Format
Edit
Size
Default
Error Message
Tab
-
1. This is the first step in adding an Account to the merchant portal.
 
2. This step should be highlighted to identify the tab the user is on.
-
-
-
-
-
-
3

Enter Gateway Details

 
Type
Notes
Rules
Compulsory
Format
Edit
Size
Default
Error Message
Tab
-
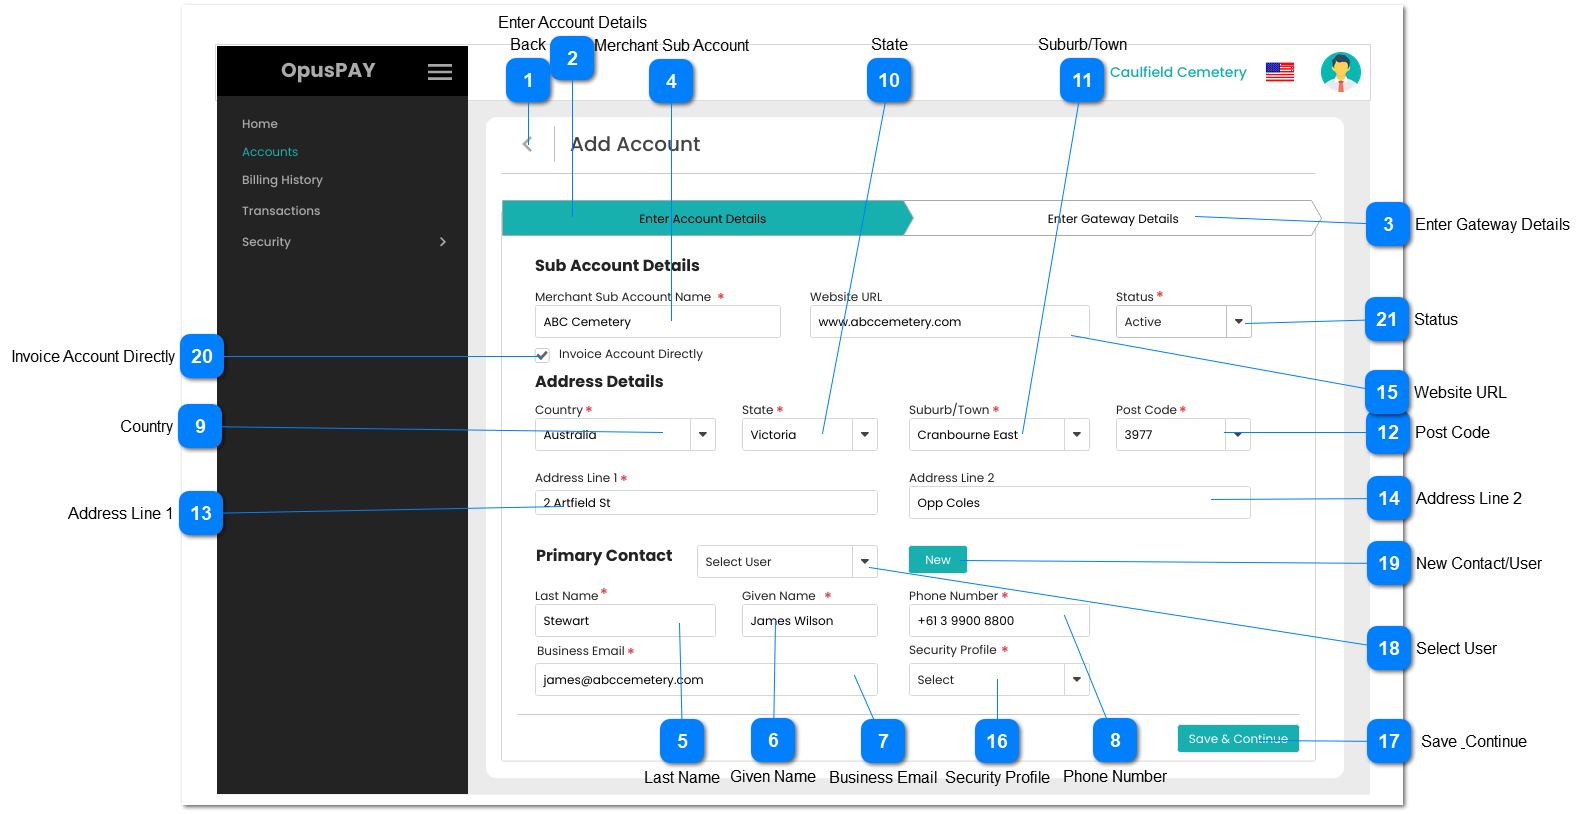
1. This is the second step in adding an Account to the merchant portal.
 
2. The step should allow the user to add a Gateway to the Account being created.
 
3. If creating a new Primary Contact person and adding the person as a User, check the database to see if there is a matching user with the same First Name AND Last Name AND Email Address. If so, display an inline error message and do not leave this screen.
 
4. Check the rule mentioned in each input elements and show inline error messages for invalid / unpopulated inputs.The user should not be progressed to the Enter Gateway Details screen.
 
5. If all validation checks are successful then:
 
  • Create the new Account and API credentials.
  • If an existing User is selected, link the user as the Primary Contact for the new Account.
  • If a New User is created:
      i. create the primary contact as a
        User record and assign the user to
        have access to this new Account.
       ii. Send an email to the user using 
         their business email address with
         a link to fill in rest of the details
         and activate their account. Refer
         to the body of the email here.
  • Save the record
  • Navigate the user to the Enter Gateway Details tab. Refer to the specifications for that screen here.
-
-
Y
-
-
3. A User already exists that matches the entered First Name, Last Name, and Email Address fields. Please enter a new user or change the options and select an existing User.
4

Merchant Sub Account

 
Type
Notes
Rules
Compulsory
Format
Edit
Size
Default
Error Message
Text
-
1. This should allow for the entry of the Merchant's Sub Account name.
 
2. If the user clicks on the Save button without entering a value in this field, display an inline error message and do not create the record.
Y
-
Y
255
-
2. Please enter the Merchant's Sub Account name
5

Last Name

 
Type
Notes
Rules
Compulsory
Format
Edit
Size
Default
Error Message
Text
-
1. This should allow for the entry of the Primary Contact's Last Name.
 
2. If the user clicks on the Save button without entering a value in this field, display an inline error message and do not create the record.
Y
-
Y
255
Disabled
2. Please enter the primary contact's Last Name.
6

Given Name

 
Type
Notes
Rules
Compulsory
Format
Edit
Size
Default
Error Message
Text
-
1. This should allow for the entry of the Primary Contact's Given Name.
 
2. If the user clicks on the Save button without entering a value in this field, display an inline error message and do not create the record.
Y
-
Y
255
Disabled
2. Please enter the primary contact's Given Name.
7

Business Email

 
Type
Notes
Rules
Compulsory
Format
Edit
Size
Default
Error Message
Text
-
1. This should allow for the entry of the Primary Contact's Business Email.
 
2. If the user clicks on the Save button without entering a value in this field, display an inline error message and do not create the record.
Y
Email
Y
255
Disabled
2. Please enter the primary contact's Email.
8

Phone Number

 
Type
Notes
Rules
Compulsory
Format
Edit
Size
Default
Error Message
Text
-
1. This should allow for the entry of the Primary Contact's Phone Number.
 
2. If the user clicks on the Save button without entering a value in this field, display an inline error message and do not create the record.
Y
-
Y
255
Disabled
1. Please enter the primary contact's Phone Number.
9

Country

 
Type
Notes
Rules
Compulsory
Format
Edit
Size
Default
Error Message
Combo-Box
-
1. This should allow the user to select a Country. List of available countries comes from the Countries & Currencies list set in the Admin Portal. Refer to the specifications for that screen here.
 
2. Use the same Address Component and logic as per byondcloud registration page.
 
3. This should display an inline error message if the user clicks the Submit button without populating this field.
 
4. If "Invoice Account Directly" is selected, Country cannot be different from the Parent Account for billing purposes. If a different country is selected, display an inline error message.
Y
-
Y
255
-
3. Please enter the organisation's Country.
 
4. If Invoicing Account Directly, Country must be the same as the Parent Account.
10

State

 
Type
Notes
Rules
Compulsory
Format
Edit
Size
Default
Error Message
Combo-Box
-
1. This should allow the user to select a State.
 
2. Use the same Address Component and logic as per byondcloud registration page.
 
3. This should display an inline error message if the user clicks the Submit button without populating this field.
Y
-
Y
255
-
3. Please enter the organisation's State.
11

Suburb/Town

 
Type
Notes
Rules
Compulsory
Format
Edit
Size
Default
Error Message
Combo-Box
-
1. This should allow the user to select a Suburb/Town.
 
2. Use the same Address Component and logic as per byondcloud registration page.
 
3. This should display an inline error message if the user clicks the Submit button without populating this field.
Y
-
Y
255
-
3. Please enter the organisation's Suburb/Town.
12

Post Code

 
Type
Notes
Rules
Compulsory
Format
Edit
Size
Default
Error Message
Combo-Box
-
1. This should allow the user to select a Post Code.
 
2. Use the same Address Component and logic as per byondcloud registration page.
 
3. This should display an inline error message if the user clicks the Submit button without populating this field.
Y
-
Y
255
-
3. Please enter the organisation's Post Code.
13

Address Line 1

 
Type
Notes
Rules
Compulsory
Format
Edit
Size
Default
Error Message
Text
-
1. This should allow for the entry of Address Line 1 for the organisation.
 
2. If the user clicks on the Save button without entering a value in this field, display an inline error message and do not create the record.
Y
-
Y
255
-
2. Please enter organisation's Address Line 1
14

Address Line 2

 
Type
Notes
Rules
Compulsory
Format
Edit
Size
Default
Error Message
Text
-
1. This should allow the user to enter the Address Line 2
-
-
Y
255
-
-
15

Website URL

 
Type
Notes
Rules
Compulsory
Format
Edit
Size
Default
Error Message
Text
-
1. This should allow the user to enter the website of the organisation.
-
-
Y
255
-
-
16

Security Profile

 
Type
Notes
Rules
Compulsory
Format
Edit
Size
Default
Error Message
Combo-Box
There must be at least one Security Profile created before a new user can be created. Refer to the specifications for the Add\Edit Security Profile screen here.
1. This should allow for the selection of the Profile for the user.
 
2. If the user clicks on the Save & Continue button without selecting a value in this field, display an inline error message.
Y
-
Y
-
Disabled
1. There must be at least one Security Profile created. Please create and select a Security Profile.
17

Save & Continue

 
Type
Notes
Rules
Compulsory
Format
Edit
Size
Default
Error Message
Button
-
1. Check the rules mentioned in each input element and show inline error messages for invalid / unpopulated inputs.
 
2. If the validation results are successful:
 
  • Create the new Account and API credentials.
  • If a new user is being created:
      i. First check the database to see if
       there is a matching user with the
       same First Name AND Last Name 
       AND Email Address. If so, display
       an inline error message and do not
       leave this screen.
       ii. If user is unique, create the
        primary contact as a User record 
        and assign the user to have access
        to this new Account
       iii. Send an email to the user using 
         their business email address with
         a link to fill in rest of the details
         and activate their account. Refer
         to the body of the email here.
  • Save the record
  • Navigate the user to the Enter Gateway Details tab. Refer to the specifications for that screen here.
-
-
-
-
-
2 i) A User already exists that matches the entered First Name, Last Name, and Email Address fields. Please enter a new user.
18

Select User

 
Type
Notes
Rules
Compulsory
Format
Edit
Size
Default
Error Message
Multi-Column Combo-Box
There must be at least one User created before a user can be selected. Refer to the specifications for the Add User screen here.
1. User can either select from the pre-filled list or can enter any characters including numbers, letters and special characters. User can then select an active User for the Primary Contact. Do not display inactive users in the list.
 
2. This allows to filter-out the matching users by Last Name (in ASC order) equal to the entered text/value and the user will be able to select an option from the list.
(a) List will display as a multi-column view of Username, Given Name, and Last Name.
 
3. If an existing active User is selected, populate all Primary Contract entry fields with appropriate User details and disable all Primary Contract entry fields.
N
-
Y
-
-
-
19

New Contact/User

 
Type
Notes
Rules
Compulsory
Format
Edit
Size
Default
Error Message
Button
-
1. When clicked, clear all Primary Contact entry fields.
 
2. Enable all Primary Contact entry fields.
-
-
-
-
-
-
20

Invoice Account Directly

 
Type
Notes
Rules
Compulsory
Format
Edit
Size
Default
Error Message
Checkbox
-
1. If Parent Merchant Account is linked to a Plan that calculates transactions Per Parent or Per Group account, disable this checkbox. Refer to the specifications for Plans here.
 
2. If checked, indicate in the database that this account is to be invoiced directly for it's transactions.
 
3. a) If a country is selected that is different than the Parent Account country, disable this checkbox.
b) If no country is selected or if the country selected is the same as the Parent Account, enable this checkbox.
N
-
Y
-
Not Checked
-
21

Status

 
Type
Notes
Rules
Compulsory
Format
Edit
Size
Default
Error Message
Column
-
1. This should display the status of the Account (Active or Inactive). If the Account is Active, it is able to pass transactions through OpusPAY. If Inactive, the Account cannot pass transactions through OpusPAY
-
-
Y
-
Active
-