This page allows a Merchant administrator to add a new user to the OpusPAY merchant portal.
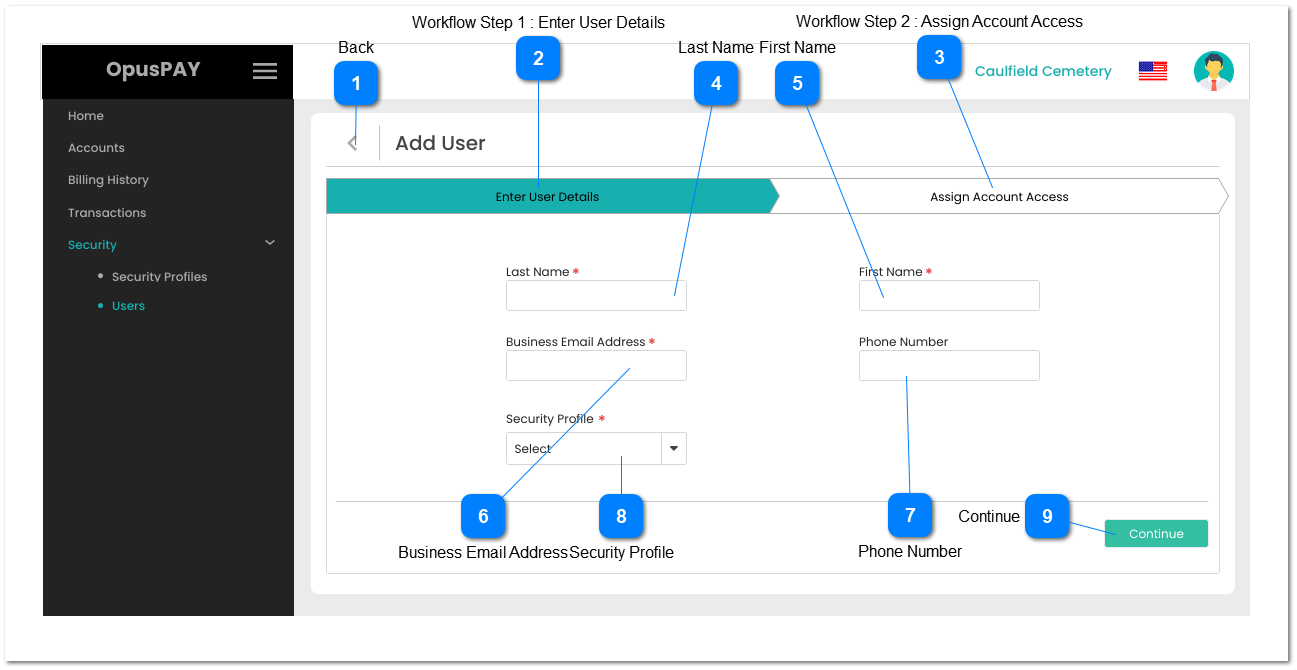
Back
Type
Notes
Rules
Compulsory
Format
Edit
Size
Default
Error Message
Button
-
1. This should allow the user to navigate to the Users screen. This will not save any details entered on this screen. Refer to the specification for that screen here.
1. This is the second step in adding a user to the merchant portal.
2. The step should allow the user to assign Account access to the user being created.
3. Check the database to see if there is a matching user with the same First Name AND Last Name AND Email Address. If so, display an inline error message and do not leave this screen.
4. Check the rule mentioned in each input elements and show inline error messages for invalid / unpopulated inputs.The user should not be progressed to the Assign Account Access screen.
5. If all validation checks are successful then navigate the user to the Add User (Assign Account Access) screen. Refer to the specification for that screen here.
-
-
Y
-
-
3. A User already exists that matches the entered First Name, Last Name, and Email Address fields. Please enter a new user.
1. This should allow for the entry of the last name of the user.
2. If the user clicks on the 'Assign Account Access' tab or the Continue button without entering a value in this field, display an inline error message and do not leave the screen.
1. This should allow for the entry of the first name of the user.
2. If the user clicks on the 'Assign Account Access' tab or the Continue button without entering a value in this field, display an inline error message and do not leave the screen.
1. This should allow for the entry of the business email address of the user.
2. If the user clicks on the 'Assign Account Access' tab or the Continue button without entering a value in this field, display an inline error message and do not leave the screen.
3. Use OpusXenta standard email validation rules to verify email address is valid.
4. If the user clicks on the Save button without a valid email address, display an inline error message.
Y
Email
Y
255
-
2. Please enter the user's Business Email Address.
There must be at least one Security Profile created before a new user can be created. Refer to the specifications for the Add\Edit Security Profile screen here.
1. This should allow for the selection of the Profile for the user.
2. If the user clicks on the 'Assign Account Access' tab or the Continue button without entering a value in this field, display an inline error message and do not leave the screen.
Y
-
Y
-
-
1. There must be at least one Security Profile created. Please create and select a Security Profile.
1. Check the rule mentioned in each input elements and show inline error messages for invalid / unpopulated inputs.The user should not be progressed to the second step in the wokflow.
2. Check the database to see if there is a matching user with the same First Name AND Last Name AND Email Address. If so, display an inline error message and do not leave this screen.
3. If all validation checks are successful then progress the user to the next step in the workflow. Refer to the specification for that step here.
-
-
-
-
-
2. A User already exists that matches the entered First Name, Last Name, and Email Address fields. Please enter a new user.