OpusPAY
User guide
×
Menu
Index

Plan Summary - Custom - Groups Edit

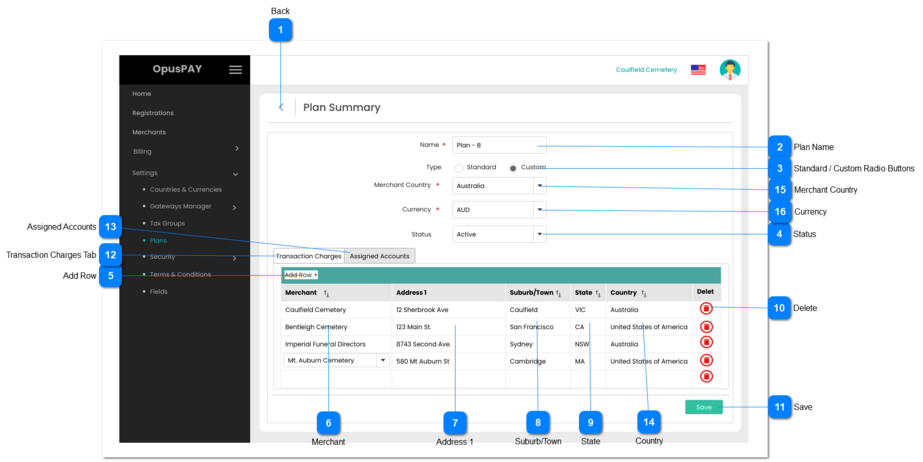
This page allows the user to edit a Custom Plan for merchants.
 
Plan Summary - Custom - Groups Edit
1

Back

 
Type
Notes
Rules
Compulsory
Format
Edit
Size
Default
Error Message
Button
-
1. Allows the user to navigate back to the Plans Grid screen without saving any changes or adding a Plan. Refer to the specification for that page here.
-
-
-
-
-
-
2

Plan Name

 
Type
Notes
Rules
Compulsory
Format
Edit
Size
Default
Error Message
Text
-
1. Allows the user to enter the name
of a Plan.
 
2. If user clicks on Save without entering a Plan name, display inline error message.
 
3. Plan name must be unique. Check Plan name against other plans in the database. If Plan name matches the name of another plan, display inline error message.
Y
-
Y
255
-
2. Please enter the name of Plan.
 
3. A Plan with this name already exists. Please enter a new Plan name.
 
 
3

Standard / Custom Radio Buttons

 
Type
Notes
Rules
Compulsory
Format
Edit
Size
Default
Error Message
Radio Buttons
Standard Plan means OpusXenta is invoicing the merchant.
 
Custom Plan means Gateway is paying OpusXenta.
1. Allows the user to choose if this is a Standard or Custom Plan.
-
-
Y
-
Standard
-
4

Status

 
Type
Notes
Rules
Compulsory
Format
Edit
Size
Default
Error Message
Combo-Box
If the Plan Status = Active, the Plan can be assigned to merchants.

If the Plan Status = Inactive, it cannot be assigned to merchants.
1. Allows the user to set the Status of the Plan to Active or Inactive.
-
-
Y
-
Active
-
5

Add Row

 
Type
Notes
Rules
Compulsory
Format
Edit
Size
Default
Error Message
Button
-
1. Allows the user to add Parent Merchant Accounts to the Plan.
-
-
Y
-
-
-
6

Merchant

 
Type
Notes
Rules
Compulsory
Format
Edit
Size
Default
Error Message
Dropdown
-
1. Allows the user to search for and select a Parent Merchant Account for this Plan. Only Active Parent Merchant Accounts that exist within the country selected are to be available to be selected.
 
2. Control should allow the user to type the name of a Merchant Account in order to filter the list to match what has been typed.
 
3. Once a Merchant has been selected, populate the Address 1, Suburb/Town, State, and Country fields. These fields will simply assist the user in confirming that the correct Merchant account has been selected.
 
4. If selected Merchant is already assigned to a Standard Plan, remove the link from the Standard Plan and link to the Custom Plan.
 
5. If selected Merchant is already assigned to a Custom Plan, display an inline error message. Merchant must be removed from their current Custom Plan before being assigned to a new Custom Plan.
N
-
Y
-
Blank
5. Merchants can only be assigned to one Custom Plan at a time.
7

Address 1

 
Type
Notes
Rules
Compulsory
Format
Edit
Size
Default
Error Message
Text
-
1. Displays Address 1 of the Parent Merchant Account selected.
N
-
N
-
-
-
8

Suburb/Town

 
Type
Notes
Rules
Compulsory
Format
Edit
Size
Default
Error Message
Text
-
1. This displays the Suburb / Town of the Parent Merchant Account selected.
N
-
N
-
-
-
9

State

 
Type
Notes
Rules
Compulsory
Format
Edit
Size
Default
Error Message
Text
-
1. This displays the State of the Parent Merchant Account selected.
N
-
N
-
-
-
10

Delete

 
Type
Notes
Rules
Compulsory
Format
Edit
Size
Default
Error Message
Button
-
1. Allows the user to delete the Merchant from this Group.
 
2. If a Merchant is deleted from the Group, display a modal popup forcing the user to select a new Plan for the Merchant. Refer to the specifications for this screen here.
-
-
Y
-
-
-
11

Save

 
Type
Notes
Rules
Compulsory
Format
Edit
Size
Default
Error Message
Button
-
1. Check the rules mentioned in each input element, starting with Transaction Charges and then with Group Accounts. Show inline error message for the first invalid / unpopulated input the check comes across, stop the check, allow the user to make changes and do not save this new Plan. 
 
2. If all validation checks are successful, save the new Plan and assign the new Plan to any Merchant Accounts linked to the Group.
 
3. Navigate the user back to the Plans Grid screen. Refer to the specification for that page here.
-
-
Y
-
-
-
12

Transaction Charges Tab

 
Type
Notes
Rules
Compulsory
Format
Edit
Size
Default
Error Message
Tab
-
1. This allows the users to specify the Tier levels for this Plan.
-
-
Y
-
-
-
13

Assigned Accounts

 
Type
Notes
Rules
Compulsory
Format
Edit
Size
Default
Error Message
Tab
-
1. This tab allows for the selection of all Parent Merchant Accounts to be added to this group plan.
 
2. This tab should be highlighted to identify the tab the user is on.
-
-
Y
-
-
-
14

Country

 
Type
Notes
Rules
Compulsory
Format
Edit
Size
Default
Error Message
Text
-
1. This displays the Country of the Parent Merchant Account selected.
N
-
N
-
-
-
15

Merchant Country

 
Type
Notes
Rules
Compulsory
Format
Edit
Size
Default
Error Message
Combo-Box
-
1. Displays the country that this Plan applies to.
 
2. The country selected determines which merchants the Plan is available for. If a merchant is not in the country selected, this Plan cannot be linked to the merchant.
-
-
-
-
-
-
16

Currency

 
Type
Notes
Rules
Compulsory
Format
Edit
Size
Default
Error Message
Combo-Box
-
1. Allows the user to select the billing currency for this Plan. Merchants assigned to this plan will be billed in the currency selected.
 
2. The country selected determines which currency is available for the Plan. Refer to the specification for this screen here.
 
3. If only one currency is available for the country selected, set this field to the currency by default.
 
4. If user clicks on Save without selecting a Currency, display inline error message.
Y
-
Y
-
-
4. Please select a Currency