To properly display this page you need a browser with JavaScript support.
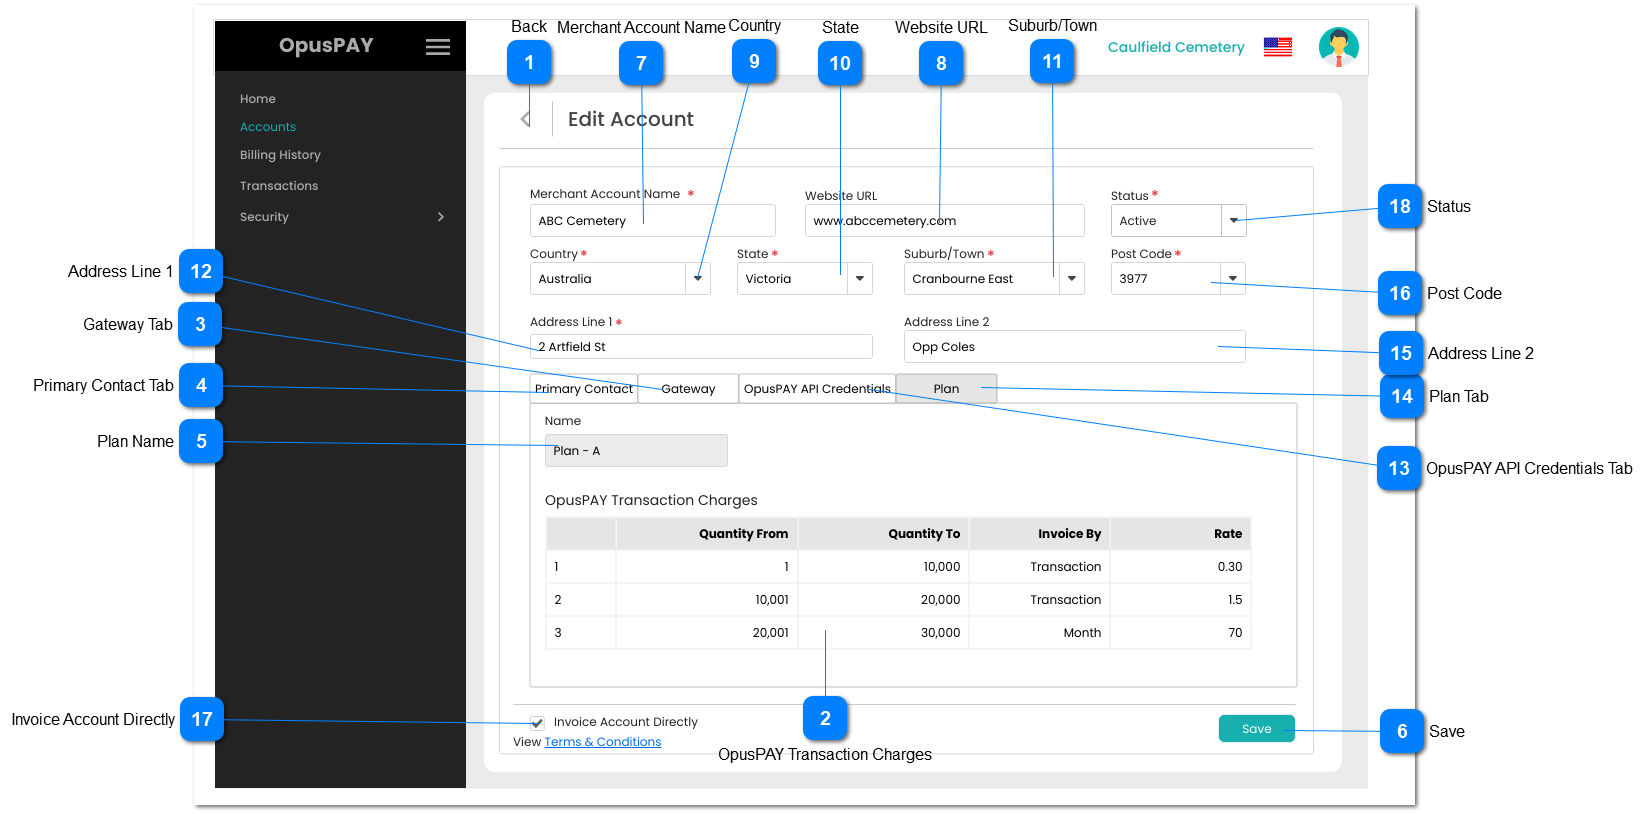
This screen allows the user to add sub-accounts to their merchant portal.
Back
Type
Notes
Rules
Compulsory
Format
Edit
Size
Default
Error Message
Button
-
1. When clicked this should navigate the user to the Accounts screen without saving any changes. Refer to the specification for that page here .
-
-
Y
-
-
-
OpusPAY Transaction Charges
Type
Notes
Rules
Compulsory
Format
Edit
Size
Default
Error Message
Column
-
1. This displays the transaction charges for each tier level for the Plan.
-
-
N
-
-
-
Gateway Tab
Type
Notes
Rules
Compulsory
Format
Edit
Size
Default
Error Message
Tab
-
1. This should allow for the entry of the Gateway details.
2. This tab should be highlighted to identify the tab the user is on.
-
-
Y
-
-
-
Primary Contact Tab
Type
Notes
Rules
Compulsory
Format
Edit
Size
Default
Error Message
Tab
-
1. This displays the Primary Contact of the Account. Refer to the specifications for that screen here .
-
-
Y
-
-
-
Plan Name
Type
Notes
Rules
Compulsory
Format
Edit
Size
Default
Error Message
Text
-
1. This will display the Plan Name for the Account.
-
-
N
-
-
-
Save
Type
Notes
Rules
Compulsory
Format
Edit
Size
Default
Error Message
Button
-
1. Check the rules mentioned in each input element and show inline error messages for invalid / unpopulated inputs.
2. If the validation results are successful save all Account details.
3. Navigate the user to the View Account - Plan screen. Refer to the specifications for that screen here .
-
-
-
-
-
-
Merchant Account Name
Type
Notes
Rules
Compulsory
Format
Edit
Size
Default
Error Message
Text
-
1. This should allow for the entry of the Merchant Account name.
2. If the user clicks on the Save button without entering a value in this field, display an inline error message and do not create the record.
Y
-
Y
255
-
2. Please enter the Merchant Account 's name
Website URL
Type
Notes
Rules
Compulsory
Format
Edit
Size
Default
Error Message
Text
-
1. This should allow the user to enter the website of the organisation.
-
-
Y
255
-
-
Country
Type
Notes
Rules
Compulsory
Format
Edit
Size
Default
Error Message
Combo-Box
-
1. This should allow the user to select a Country. List of available countries comes from the Countries & Currencies list set in the Admin Portal. Refer to the specifications for that screen here .
2. Use the same Address Component and logic as per byondcloud registration page.
3. This should display an inline error message if the user clicks the Submit button without populating this field.
Y
-
Y
255
-
3. Please enter the organisation's Country.
State
Type
Notes
Rules
Compulsory
Format
Edit
Size
Default
Error Message
Combo-Box
-
1. This should allow the user to select a State.
2. Use the same Address Component and logic as per byondcloud registration page.
3. This should display an inline error message if the user clicks the Submit button without populating this field.
Y
-
Y
255
-
3. Please enter the organisation's State.
Suburb/Town
Type
Notes
Rules
Compulsory
Format
Edit
Size
Default
Error Message
Combo-Box
-
1. This should allow the user to select a Suburb/Town.
2. Use the same Address Component and logic as per byondcloud registration page.
3. This should display an inline error message if the user clicks the Submit button without populating this field.
Y
-
Y
255
-
3. Please enter the organisation's Suburb/Town.
Address Line 1
Type
Notes
Rules
Compulsory
Format
Edit
Size
Default
Error Message
Text
-
1. This should allow for the entry of Address Line 1 for the organisation.
2. If the user clicks on the Save button without entering a value in this field, display an inline error message and do not create the record.
Y
-
Y
255
-
2. Please enter organisation's Address Line 1
OpusPAY API Credentials Tab
Type
Notes
Rules
Compulsory
Format
Edit
Size
Default
Error Message
Tab
-
1. This displays the Accounts API Credentials and allows the user to generate new credentials. Refer to the specifications for this screen here .
-
-
Y
-
-
-
Plan Tab
Type
Notes
Rules
Compulsory
Format
Edit
Size
Default
Error Message
Tab
-
1. This displays the Plan assigned to the Parent Entity.
2. This tab should be highlighted to identify the tab the user is on.
-
-
Y
-
-
-
Address Line 2
Type
Notes
Rules
Compulsory
Format
Edit
Size
Default
Error Message
Text
-
1. This should allow the user to enter the Address Line 2
-
-
Y
255
-
-
Post Code
Type
Notes
Rules
Compulsory
Format
Edit
Size
Default
Error Message
Combo-Box
-
1. This should allow the user to select a Post Code.
2. Use the same Address Component and logic as per byondcloud registration page.
3. This should display an inline error message if the user clicks the Submit button without populating this field.
Y
-
Y
255
-
3. Please enter the organisation's Post Code.
Invoice Account Directly
Type
Notes
Rules
Compulsory
Format
Edit
Size
Default
Error Message
Checkbox
-
1. If checked, indicate in the database that this account is to be invoiced directly for it's transactions.
N
-
Y
-
Not Checked
-
Status
Type
Notes
Rules
Compulsory
Format
Edit
Size
Default
Error Message
Column
-
1. This should display the status of the Account (Active or Inactive). If the Account is Active, it is able to pass transactions through opuspay. If Inactive, the Account cannot pass transactions through opuspay.
2. If the user changes the Status from Active to Inactive for a Parent Account, all Sub Accounts that are set to "Invoice Account Directly" = "False" and/or where the Gateway is set to "Link to the Parent Entity's gateway account", set the Sub Account to Inactive as well.
byondpro should also be updated to show that the merchant account is inactive (which would display as On-Hold in byondpro).
3. If the Parent Merchant Account has been set to Inactive from the Admin Portal, all Sub Accounts must be set to Inactive as well and neither the Parent or Sub Accounts can be set to Active. They can only be activated from the Admin portal again.
Y
-
Y
-
Active
-