OpusPAY
User guide
×
Menu
Index

Settings - Sites

 
Link byondcloud sites to opuspay merchant accounts
 
Settings - Sites
1

Tabs

 
3 tabs are required for this function
 
Type
Notes
Rules
Compulsory
Format
Edit
Size
Default
Error Message
UI Tabs
 
  • Tabs are required for:
  • Sites
  • API Credentials
  • Devices
     
  • If the user tries to move to a different tab without the details within the current screen being saved, display error message.


2. Your edits have not been saved. Are you sure you want to continue?
2

Primary opuspay Merchant ID

 
Enter the opuspay Merchant ID
 
Type
Notes
Rules
Compulsory
Format
Edit
Size
Default
Error Message
TextBox
 
  • Enter the opuspay merchant Account ID manually.
Y


Blank
Please enter your merchant ID. You can retrieve this ID from your opuspay portal.
3

Primary opuspay Merchant API Key

 
Enter the opuspay merchant API key
 
Type
Notes
Rules
Compulsory
Format
Edit
Size
Default
Error Message
TextBox
 
  • Enter the opuspay merchant API key manually.
Y


Please enter your opuspay merchant API key. You can retrieve this ID from your opuspay portal.
4

Primary opuspay Merchant Secret Key

 
Enter the opuspay merchant secret key
 
Type
Notes
Rules
Compulsory
Format
Edit
Size
Default
Error Message
TextBox
 
  • Enter the opuspay merchant secret key manually.
Y


Please enter your opuspay merchant secret key. You can retrieve this ID from your opuspay portal.
5

Primary opuspay Merchant Name

 
View the merchant name
 
Type
Notes
Rules
Compulsory
Format
Edit
Size
Default
Error Message
TextBox
 
  • Displays the merchant name registered in opuspay (not the name in byondcloud)
N
 
N


6

Find Button

 
Validate the merchant ID and merchant API data entered
 
Type
Notes
Rule
Compulsory
Format
Edit
Size
Default
Error Message
Button
 
  • Call the opuspay API and retrieve the opuspay Merchant account record that exactly matches both the opuspay Merchant ID and opuspay Merchant API Key fields in opuspay (not the gateway API keys).
  • If there is a match between the entered Merchant ID and Merchant API Key after pressing the Find button, then display the Merchant Name in the Merchant Name field and store the opuspay API private and public keys in byondcloud - these to be hashed and encrypted
  • If there is no match then pop up a message saying that no match could be found.
  • On first login, the 'Find' button should be active. After all the settings are saved, this button should be remain active.


3. No match could be found. Please check the detail entered and correct it as needed.
7

Change Button

 
Makes the fields in the UI editable
 
Type
Notes
Rules
Compulsory
Format
Edit
Size
Default
Error Message
Button
 
  • Change the UI from view only to making the fields editable (where allowed).
     
  • On first login, the 'Change' button should be active. After all the settings are saved, this button should remain active.
    2a. After all the settings are saved, clicking on this button should re-activated the 'Save' button.


8

Tick Box

 
Select if all all sites will be using the same opuspay merchant account
 
Type
Notes
Rules
Compulsory
Format
Edit
Size
Default
Error Message
CheckBox
 
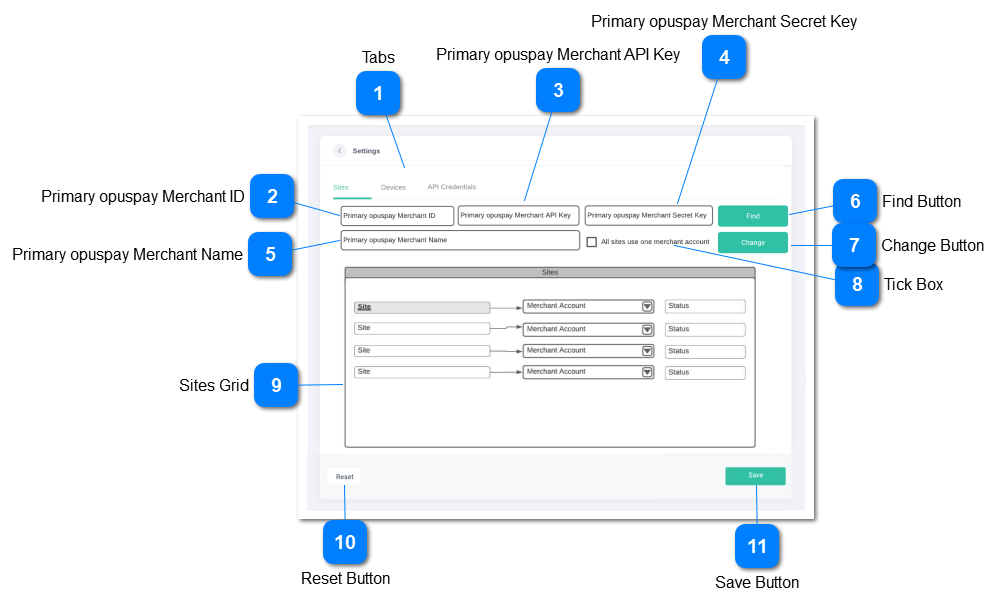
  • Disabled and cannot be checked or unchecked until the 'Change' button is pressed.
2. When checked do the following:
    a. If no Merchant accounts have been selected  
    yet, when the user selects any Merchant
    account for any Site, set all Sites to the same
    Merchant account. For example, if there are
    four Sites in byondcloud (A, B, C, and D) and
    three Merchant accounts (M1, M2, and M3). If
    the user selects Site A to use Merchant
    account M2, set Sites B, C, and D to also use
    M2.
    b. If all Sites are already linked to a Merchant
    account (such as M1), and one Site (such as
    Site D) is changed to use another Merchant
    account (such as M3), all Sites are changed to
    the same Merchant account (M3).
    c. If all Sites use different Merchant accounts
    when this checkbox is checked, set all Sites to
    use the same Merchant account as the first
    Site in the list.
3. When unchecked, each Site can use a different Merchant account.
If Sites are already set to use a Merchant account, leave them set to that Merchant account. User can then change each Site to use a different Merchant account if desired.
N


Disabled
 
9

Sites Grid

 
The grid allows for the linking of sites and merchant accounts
 
Type
Notes
Rules
Compulsory
Format
Edit
Size
Default
Error Message
Grid
 
  • The grid has two columns:
  • Site
  • Merchant Account


Text
Site
  • Show a list of all sites that have been setup in byondcloud
  • If "Use the same merchant account for all sites" is checked, then grey out the grid and display all sites in the grid with the linked Primary Merchant Account.
  • If "Use the same merchant account for all sites" is NOT checked, display all sites in the grid and allow for selection of the linked Merchant Account.
 
 
N


ComboBox
Merchant account
  • If "Use the same merchant account for all sites" is checked, then grey out the grid and display all sites in the grid with the linked Primary Merchant Account.
  • When selected or the first 3 characters are entered, show a list of all the matching opuspay merchant accounts linked to the Primary Merchant account
  • Allow for the selection of a single merchant account from the list
  • Each site must have a merchant account linked to it
  • Multiple sites can use the same merchant account
  • Store the opuspay API private and public keys for the Merchant account assigned to each Site in byondcloud - these to be hashed and encrypted
Y
 
Y
 
 
Please select a merchant account
Text
Status
  • Shows the current status of the selected merchant account
  • The status can be:
  • Active
  • On-Hold
  • The status is defined by the status set in the Admin portal for a merchant account
 
 
N


10

Reset Button

 
Reset all fields with data
 
Type
Notes
Rules
Compulsory
Format
Edit
Size
Default
Error Message
Button
 
  • When selected reset all values within all editable fields so that the fields are blank.
     
  • On first login, the 'Reset' button should be active. After all the settings are saved, this button should be remain active.


11

Save Button

 
Save data
 
Type
Notes
Rules
Compulsory
Format
Edit
Size
Default
Error Message
Button
 
  • On first login, the 'Save' button should be active. After all the settings are saved, this button should be de-activated (Refer rule 3b below).
     
  • Validate data on all tabs to ensure compliance will rules
     
  • If all validation passes then save all changed or new data.
    3a. Popup a success message for a successful save.
    3b. After all the settings are saved, deactivate the 'Save' button. This button should be re-activated only once the 'Change' button is clicked.
     
  • If validation fails then highlight the fields requiring attention in red and highlight the tab on which the error fields exist in red as well.
    4a. Pop up an alert that errors exist and need to be corrected.


3a. The settings have been saved successfully.
 
4a. Please note there are some errors with the information you have entered.Please check the highlighted fields and correct as appropriate.