OpusPAY
User guide
×
Menu
Index

Add User (Assign Account Access)

This workflow step allows the admin to give account level access to the user.
 
Add User (Assign Account Access)
1

Back

 
Type
Notes
Rules
Compulsory
Format
Edit
Size
Default
Error Message
Button
-
1. This should allow the user to navigate to the Enter User Details screen. Refer to the specification for that screen here.
-
-
-
-
-
-
2

Workflow Step 1: Enter User Details

 
Type
Notes
Rules
Compulsory
Format
Edit
Size
Default
Error Message
Tab
-
1. This is the first step in adding a user to the merchant portal.
 
2. This step should display all user fields required to create a user.
 
3. Clicking on this tab will navigate the user to the Add User Details screen. Refer to the specification for that screen here.
-
-
Y
-
-
-
3

Workflow Step 2 : Assign Account Access

 
Type
Notes
Rules
Compulsory
Format
Edit
Size
Default
Error Message
Tab
-
1. This is the second step in adding a user to the merchant portal.
 
2. The tab should be highlighted to identify the tab the user is currently on.
 
3. The tab will allow the user to assign Merchant Account Access to the user being created.
-
-
-
-
-
-
4

Select All Accounts

 
Type
Notes
Rules
Compulsory
Format
Edit
Size
Default
Error Message
Switch Control
-
1. Clicking on this control will auto-switch on all accounts' switch controls.
 
2. If this switch is on, clicking on it will auto-switch off all accounts' switch controls.
 
3. This should auto-switch off when when even one switch control at account level is turned off.
-
-
Y
-
On
-
5

Accounts

 
Type
Notes
Rules
Compulsory
Format
Edit
Size
Default
Error Message
Column
-
1. This should display the merchant account names.
 
2. This should be sortable.
-
-
-
-
-
-
6

Account level control

 
Type
Notes
Rules
Compulsory
Format
Edit
Size
Default
Error Message
Switch Control
-
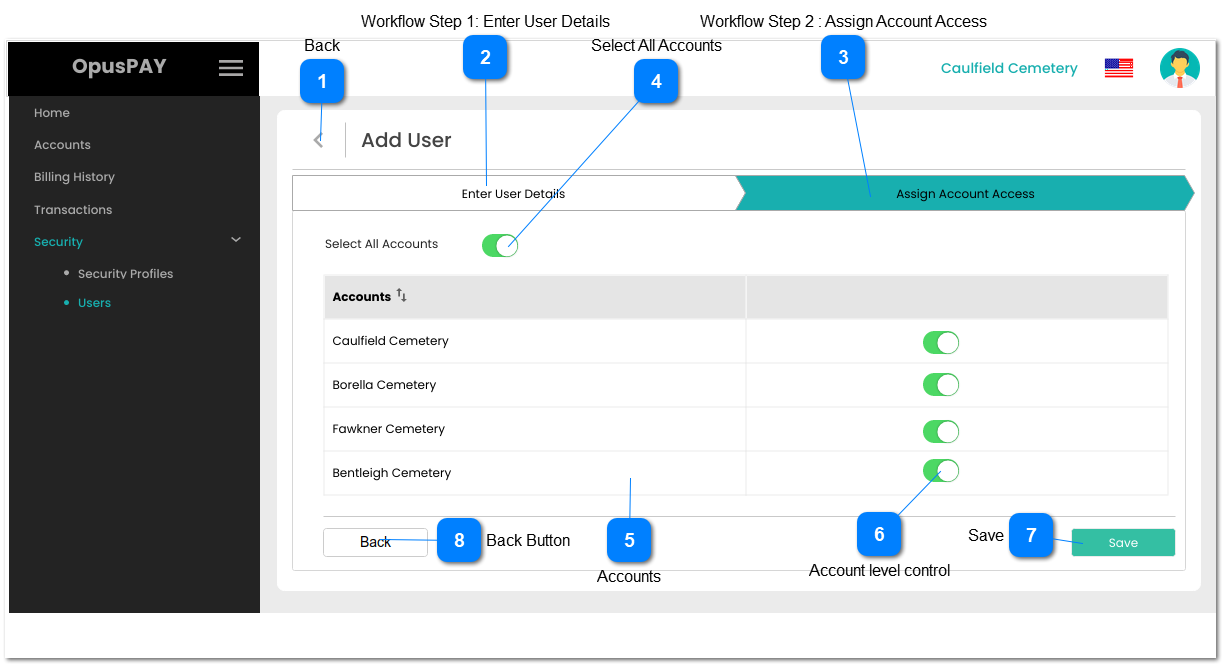
1. This should allow the user to switch-on and provide access at an individual account level.
 
2. This should allow the user to switch off and restrict access at an individual account level. If Select All Accounts is switched on when this account is switch off, switch off the Select All Accounts switch.
 
3. At least one Account must be switched on. If there are no Accounts switched on when the Save button is clicked, display inline error message.
Y
-
Y
-
On
3. Please switch on access to at least one merchant account for the user.
7

Save

 
Type
Notes
Rules
Compulsory
Format
Edit
Size
Default
Error Message
Button
-
1. Check the rule mentioned in each input elements and show inline error messages for invalid / unpopulated inputs.
 
2. If all validation checks are successful save the user record in an Inactive state.
 
3. Send an email to the user using  their business email address with a link to fill in rest of the details and activate their account. Refer to the body of the email here.
 
4. Navigate the user to the Users screen. Refer to the specification for that screen here.
 
-
-
Y
-
-
-
8

Back Button

 
Type
Notes
Rules
Compulsory
Format
Edit
Size
Default
Error Message
Button
-
1. Clicking on this button will navigate the user to the Add User Details screen. Refer to the specification for that screen here.
-
-
-
-
-
-