OpusPAY
User guide
×
Menu
Index

Generate Invoices

 
This screen allows the user to generate and send transaction invoices to OpusPAY merchants.
 
OpusPAY MVP v1.0:
 
 
Generate Invoices
1

Tool tip

 
Type
Notes
Rules
Compulsory
Format
Edit
Size
Default
Error Message
Tool tip
-
1. This should display a message to the user upon hovering action.
Message: "Selected invoice date is until 11:59:59pm on that day."
-
-
-
-
-
-
2

Invoice Period To Date

 
Type
Notes
Rules
Compulsory
Format
Edit
Size
Default
Error Message
Date
This is the date up to which the billing calculations will be done. This includes all transactions not yet marked as invoiced up to 11:59:59 pm on this date.
1. This should allow the user to select the ending date of the invoicing period.
 
2. Date field is blank and displays a calendar tool when the user clicks on this field (similar to Generate Transaction Invoices in byondcloud).
Y
-
Y
-
Blank
Please select an invoice date.
3

Run

 
Type
Notes
Rules
Compulsory
Format
Edit
Size
Default
Error Message
Button
Refer to the following work flows:
1. When clicked, if grid is already populated with Merchants, clear grid.
 
2. a) Display an Information message (eg RecordKeepr import message) with an OK button and the following wording: "Invoice generation in progress. You will receive an email when the process has been completed."
b) Email the user when the process is completed. View the specification for the email here.
 
3. Populate grid as per logic below this table.
-
-
-
-
-
-
 
Grid Population Logic:
Refer to the workflow here.
 
  • Select Next Parent Merchant.
     
  • Select the Merchant Plan.
     
  • Count the number of transactions that have not yet been invoiced for.
     
  • Select the Rate to be applied to the Merchant based on the Plan's Tier-Level row matching the number of transactions that have not yet been invoiced for.
  • If Tier-Level Rate = Month
           Tier-Level Total = Rate
  • If Tier-Level Rate = Transaction
           Tier-Level Total = Number of Transactions multiplied by the Rate
     
  • Add Tier-Level Total to merchant Subtotal.
     
  • Is there another Tier-Level Row applicable to this Merchant based on the Plan and the total number of transactions not yet invoiced for?
  • If yes, repeat steps 4 and 5.
  • If no, continue.
     
  • Is there another sub merchant account to be added to this invoice?
  • If yes, select the next sub merchant account and count the number of transactions for this account. Then repeat steps 4 to 6.
  • If no, continue.
     
  • Calculate Invoice Total for this merchant.
 
Invoice Total = merchant Subtotal multiplied by (Tax Rate (linked to the merchant per Tax Group) as a number, plus 1).
 
For example:
  • Merchant Subtotal = $70.
  • Tax Group = Canadian Tax Group with Tax Rate of 13.45%
  • 13.45% as a number = 0.1345
  • Therefore:
  •    70 X (1 + 0.1345) =
  •    70 X 1.1345 = 79.415 =
  •    $79.42 (rounded to the nearest cent)
 
9. Add Plan, Merchant, Currency, and Invoice Total to grid.
 
10. Is there another sub merchant account to be invoiced individually?
  • If yes, select the next sub merchant account to be invoiced individually and count the number of transactions for this account. Then repeat steps 4 to 9.
  • If no, keep the transation count for this Merchant in temporary memory/storage for use for creating an invoice and continue.
 
11. Is there another merchant in the database?
a. If yes, select next merchant, repeat steps 1 to 10.
b. If no, grid is populated. Run is complete.
 
4

Number of Records

 
Type
Notes
Rules
Compulsory
Format
Edit
Size
Default
Error Message
Combo-Box
-
1. This should allow the user to select an option to control the number of invoice records visible in the grid.
 
2. Displays following options to select from:
 
  • 10
  • 25
  • 50
  • 100
 
-
-
Y
-
10
-
5

Search Filter

 
Type
Notes
Rules
Compulsory
Format
Edit
Size
Default
Error Message
Text
-
1. Filters the grid by matching the input entered by the user across the "Merchant" grid column.
 
2. Filter results based on each character entered. For example:
  • if "c" is entered, only the first, second, and fifth rows in the on screen example will be displayed. This is based on both "Caulfield" and "Cemetery" within the merchant name and "CAD" in the currency column.
  • If "ca" is entered only the first and fifth rows in the on screen example will be displayed based on "Caulfield" in the merchant name and "CAD" in the currency column.
-
-
Y
-
-
-
6

Select Column

 
Type
Notes
Rules
Compulsory
Format
Edit
Size
Default
Error Message
Checkbox
Selected Merchants will be invoiced when the Accept button is clicked.
1. The checkbox in the column header will allow the user to check or uncheck all merchants.
 
2. The checkboxes beside each individual merchant will allow the user to select or unselect each individual merchant, if desired.
-
-
Y
-
Unchecked
-
7

Plan Name

 
Type
Notes
Rules
Compulsory
Format
Edit
Size
Default
Error Message
Column
-
1. This column should display the names of the Plans assigned to the Merchants.
 
2. This should be sortable.
-
-
-
-
-
-
8

Merchant

 
Type
Notes
Rules
Compulsory
Format
Edit
Size
Default
Error Message
Column
-
1. This column should display the names of the merchants with transactions to be invoiced for as at the Invoice Date.
 
2. This should be sortable.
-
-
-
-
-
-
9

Currency

 
Type
Notes
Rules
Compulsory
Format
Edit
Size
Default
Error Message
Column
-
1. This column should display the currency for each Merchant. Merchants will be invoiced in this currency.
 
2. This should be sortable.
-
-
-
-
-
-
10

Amount

 
Type
Notes
Rules
Compulsory
Format
Edit
Size
Default
Error Message
Column
-
1. This column should display the invoice total for each merchant.
 
2. This should be sortable.
-
-
-
-
-
-
11

Preview

 
Type
Notes
Rules
Compulsory
Format
Edit
Size
Default
Error Message
Button
-
1. This should allow the user to preview the invoice details in a pop-up modal. Refer to the specification for that modal here.
 
2. Use date Preview button is clicked as the Invoice Date.
 
3. For the Invoice Period. If this is the first time the invoice is generated for the merchant, show as "Up to <Invoice Period To Date>". Otherwise, show "<Last Period Invoice To Date> to <"Invoice Period To Date">".
 
4. Create Preview Invoice (refer to Invoice Creation Logic below this table).
-
-
-
-
-
-
 
  • Select Merchant Transaction that is not already linked to an OpusPAY invoice.
     
  • Add the following Transaction Details to the "Transaction Details" area of the Invoice and number the Transactions in the list:
  • Transaction Date
  • Transaction Invoice Number (from byondpro or other application)
  • Transaction Type (Payment, Refund, etc.) - Display Refund as a negative value
  • Customer Name
  • Transaction Value
     
    3. Is there another transaction linked to the merchant that is not linked to an OpusPAY invoice?
  • If yes, repeat steps 1 and 2.
  • If not, continue to step 4.
 
4. Create "Invoice Summary" portion of invoice by doing the following:
a. Add Row and enter the following:
    I. Add Tier Number to first row details (starting at "Tier 1" and incrementing for each row)
    II.  For this merchant, retrieve the Transaction Count from memory that was used in populating the grid.
    III. Is Transaction Count greater than Plan "Quantity To" for Tier-Level row?
      If Yes, do the following:
           a. Number of Transactions = "Quantity To" - "Quantity From" + 1
           b. Is Frequency = Month?
               i.  If Yes, enter "Rate" as Rate and Total for the row
               ii. If No:
- enter "Rate" as Rate
- multiply "Rate" X "Quantity To"
- then enter result as Total for the row
c. Update Transaction Count by subtracting "Quantity To" from Transaction Count to get an updated Transaction Count for the next Tier-Level row.
d. Repeat step 4a part (III) for the next Tier-Level row.     
      If No, do the following:
      a. Number of Transactions = Transaction Count
      b. Is Frequency = Month?
          If Yes, enter "Rate" as Rate and Total for the row
                                   If No:
- enter "Rate" as Rate
- multiply "Rate" X difference
- then enter result as Total for the row.
                               c. Proceed to step 5.
 
5. Calculate Invoice Summary Subtotal and add as an invoice line.
 
6. Display "Tax <<Tax Rate>>" as a line below Subtotal line, calculate tax and display below Subtotal. 
 
7. Calculate Invoice Total by adding Subtotal and Tax, display Total below Tax.
 
8. Add "Preview" as a watermark on the invoice to show this is not an actual invoice.
 
9. Display Preview Invoice. Refer to the specification for that modal here.
12

Pagination Control

 
Type
Notes
Rules
Compulsory
Format
Edit
Size
Default
Error Message
Button
-
1. This allows the user to page through the invoice grid results when clicked.
 
2. To determine the number of pagination buttons to display please follow the current logic that is being used in byondcloud.
-
-
-
-
-
-
13

Accept

 
Type
Notes
Rules
Compulsory
Format
Edit
Size
Default
Error Message
Button
-
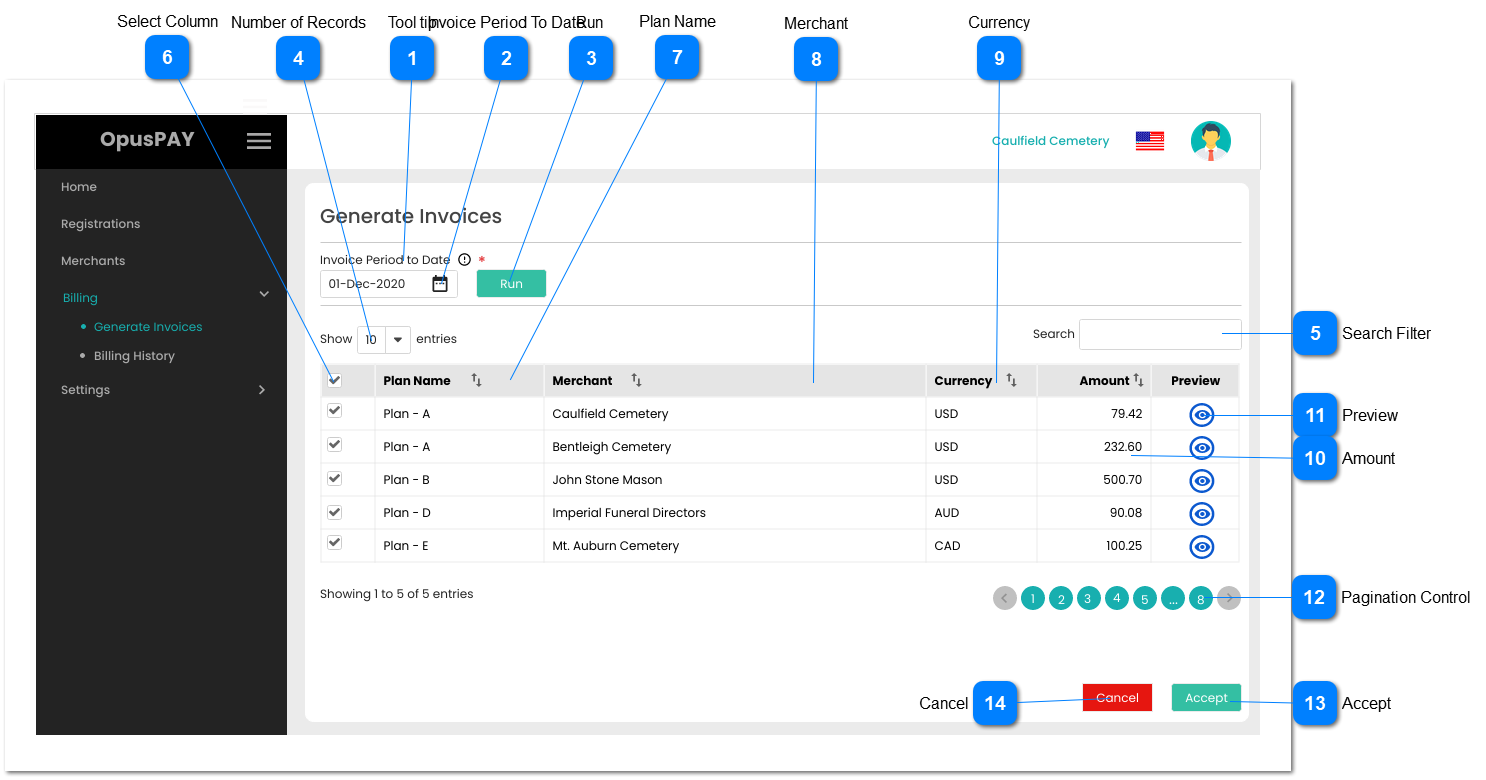
1. This should be disabled until at least one merchant is selected to generate an invoice for.
 
2. Create Invoice Record for each Merchant selected:
  2a. Generate Invoice # for merchant
  and store with Invoice Record.
  2b. Set Invoice Date to date Accept
  button is clicked and store with
  Invoice Record.
  2c. For the Invoice Period. If this is
  the first time the invoice is generated
  for the merchant, show as "Up
  to <Invoice Period To Date>".
  Otherwise, show "<Last Period
  Invoice To Date> to <"Invoice Period
  To Date">".
  2d. Link the Merchants Plan and
  Tax Group to Invoice Record.
  2e. Create Invoice (refer to Invoice  
  Creation Logic below this table).
  View the specifications for the
  Invoice here.
  2f. Link each Merchant Transaction
  included on this invoice to this
  Invoice Record to prevent them
  from being invoiced for again in
  future.
 
3. Create Invoice PDF for each Merchant selected and persist them to the server / AWS S3 buckets. Add filepath of this PDF to the Invoice Record for the merchant.
 
4. Email each Merchant selected their corresponding PDF Invoice. View the specification for the email here.
 
5. Clear the Invoice Date, Search filter and grid.
-
-
-
-
Disabled
-
 
Invoice Creation Logic:
 
For each Merchant selected, do the following:
 
  • Select Merchant Transaction that is not already linked to an OpusPAY invoice.
     
  • Add the following Transaction Details to the "Transaction Details" area of the Invoice and number the Transactions in the list:
  • Transaction Date
  • Transaction Invoice Number (from byondpro or other application)
  • Transaction Type (Payment, Refund, etc.) - Display Refund as a negative value
  • Customer Name
  • Transaction Value
     
    3. Is there another transaction linked to the merchant that is not linked to an OpusPAY invoice?
  • If yes, repeat steps 1 and 2.
  • If not, continue to step 4.
 
4. Create "Invoice Summary" portion of invoice by doing the following:
a. Add Row and enter the following:
    I. Add Tier Number to first row details (starting at "Tier 1" and incrementing for each row)
    II. For this merchant, retrieve the Transaction Count from memory that was used in populating the grid.
    III. Is Transaction Count greater than Plan "Quantity To" for Tier-Level row?
      If Yes, do the following:
           a. Number of Transactions = "Quantity To" - "Quantity From" + 1
           b. Is Frequency = Month?
               i.  If Yes, enter "Rate" as Rate and Total for the row
               ii. If No:
- enter "Rate" as Rate
- multiply "Rate" X "Quantity To"
- then enter result as Total for the row
c. Update Transaction Count by subtracting "Quantity To" from Transaction Count to get an updated Transaction Count for the next Tier-Level row.
d. Repeat step 4a part (III) for the next Tier-Level row.     
      If No, do the following:
      a. Number of Transactions = Transaction Count
      b. Is Frequency = Month?
          If Yes, enter "Rate" as Rate and Total for the row
                                   If No:
- enter "Rate" as Rate
- multiply "Rate" X difference
- then enter result as Total for the row.
                               c. Proceed to step 5.
 
5. Calculate Invoice Summary Subtotal and add as an invoice line.
 
6. Display "Tax <<Tax Rate>>" as a line below Subtotal line, calculate tax and display below Subtotal. 
 
7. Calculate Invoice Total by adding Subtotal and Tax, display Total below Tax.
 
8. Is there another Merchant selected in the grid?
 
  If Yes, repeat steps 1 to 7.
 
  If not, return to the table above and complete remaining steps for the Accept button starting with step 2f.
14

Cancel

 
Type
Notes
Rules
Compulsory
Format
Edit
Size
Default
Error Message
Button
-
1. This should be disabled until the Run button is pressed and the grid is populated.
 
2. Clear the grid and delete all temporary tables, etc..
-
-
-
-
Disabled
-